Workflow
Treat Playmatic like your AI QA teammate. It helps you write, run, and maintain your tests automatically using Playwright.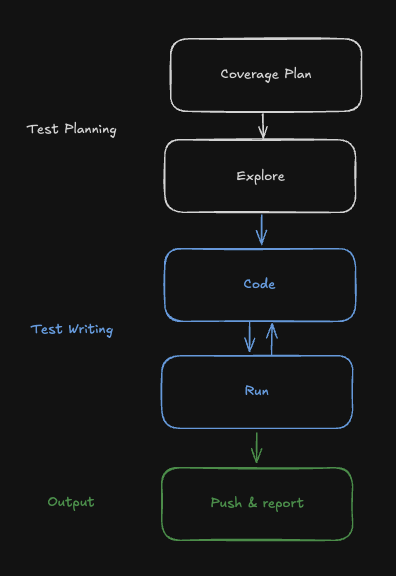
Test Planning
To start, you always talk to Playmatic in Slack by describing your testing needs. This could be creating or maintaining an existing set of tests. Playmatic will analyze your codebase to create a test plan that covers all the tests and their goals. It will iterate with you in Slack to ensure there’s comprehensive coverage for your needs. Once you’ve approved the test plan, Playmatic will gather any prerequisites for testing and store the collected test data and variables in theplaymatic.config.ts file. Learn more about environment management.
Now, Playmatic will explore your website using its own browser to understand the available user paths and selectors.
Coding
Once Playmatic understands the user paths and the selectors, Playmatic will start coding! It will build end-to-end tests and validate them by continuously running and reviewing the newly created tests until (1) it’s clear that there is a real bug or (2) the test passes. You’ll receive feedback in Slack after each test is completed. To ensure tests are stable and non-flaky, Playmatic will sometimes use AI actions likeaiClick() and aiVerify() to augment existing Playwright tests. Whenever the agent does this, it will always leave a comment to let you know why.
Output
At the end of this iteration loop, Playmatic will push up a PR and post a summary message in Slack with the link to the PR. In the PR, it will commit any tests that have been confirmed to pass as is. It will mark any tests where the agent wasn’t able to identify stable selectors using Playwright’stest.fixMe() annotation.
For any tests where Playmatic identified a real bug, it will be reported in the Slack message. You will also be able to see:
- the number of iterations the agent took for each test
- the total development time
Next steps
AI actions
Learn how to augment Playwright tests with AI actions.
Environment Management
Learn about the environment management features of the Playmatic SDK.